
Are you also annoyed by your guitar not staying in tune and the strings continuously buzzing against the frets? It is time for you to set up your electric guitar.
Setting up your electric guitar will not only help you correct the poor intonation but will also get rid of problems like the fret buzz through string adjustments. And if you are worried about not knowing where to begin or what to do when doing an electric guitar setup- follow our step-by-step, easy, and detailed guide that will teach you how to tune your guitar to perfection.
But before you delve into tuning your guitar, remember not to miss out on any step, and when confused or lost doing the setup, rewind and repeat!
Tools Needed For Electric Guitar Setup
- Phillips head screwdriver
- Ruler measuring 64 inches
- Hex key that is of the right size for your guitar’s truss rod (usually comes with the guitar)
- Hex key for strut style bridge, or flathead screwdriver for tune-o-matic style bridge
- A capo
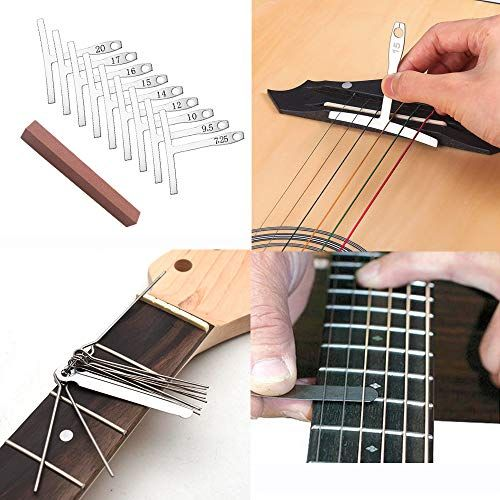
- Feeler gauges
- New strings
- Guitar tuner
Also, it is important to note that when considering a guitar tuner:
- Buy a high-quality tuner
- A tuner that has a reliable level of accuracy (1/10th of a semitone or +/-2 cents)

Step 1: Removing or Changing Electric Guitar Strings
The first step in a guitar setup is removing all the strings. If your guitar strings have been in use for quite a long time, you should consider changing and replacing them with new strings.
You might have damaged your old strings or worn them out due to the guitar’s consistent use, so the setup is a good opportunity to plug in those new set of strings. Because the strings have a high pulling force, or there might be excess string tension, you might likely bend the neck of the guitar out of shape, so loosen the strings in the precise order:
- Low E string
- High E string
- A string
- B string
- D string
- G string
It’s highly recommended to alleviate tension across the entire guitar neck verses removing each string one by one. You can do this by loosening each string 3 full turns starting on the Low E string. Repeat the process 2x and then remove each string individually.
After loosening and detaching the strings from the fretboard, lubricate all the string points with a graphite lubricant to reduce friction between the bridge and the strings for smoother tuning. In the meanwhile, also check for any loose bolts or screws at the guitar bridge, and tighten them up.
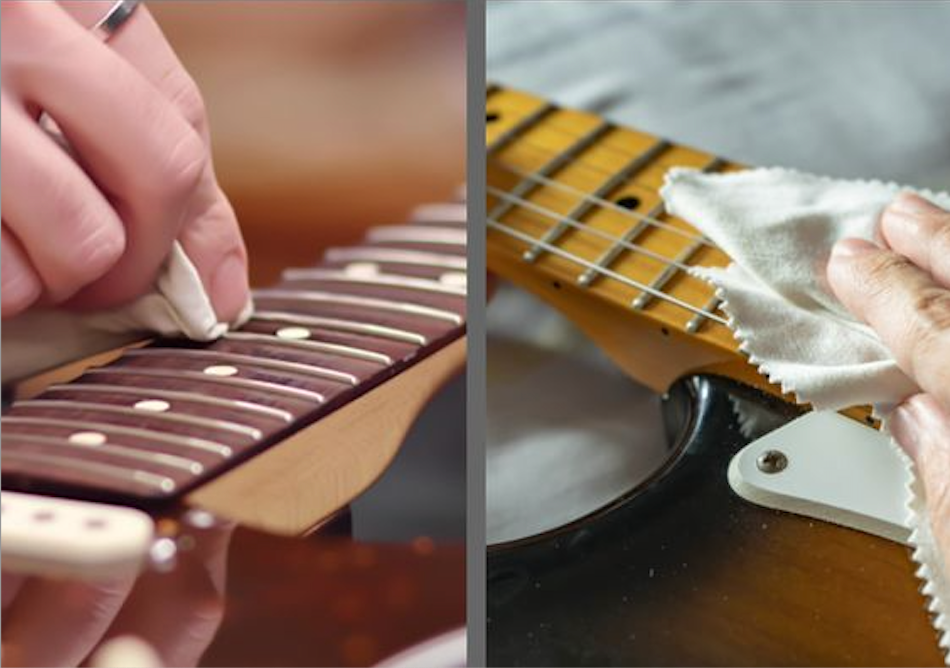
Step 2: Cleaning the guitar
Once the strings are off, and you have all that fretboard space easily accessible and available to you- clean the guitar of all the potential dirt, making it hard to play.
However, be cautious, as using a strong chemical or cleanser on the fretboard can damage the wood.
- Maple boards have a lacquer finish, so the best way to clean them is simply with a damp cloth.
- Ebony or rosewood fretboards are lacquer-free, so you can use your favorite cleaning liquid or the traditional cleaning remedy of lemon oil to eliminate the gunk.
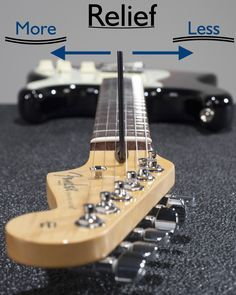
Step 3: Neck Relief Adjustment
Before beginning the guitar neck adjustment, secure the strings back on the guitar. Your guitar’s neck relief is set by adjusting the metal rod that runs through the guitar’s entire length of the neck, also known as the truss rod.
Although people are concerned about adjusting the truss rod of electric guitars themselves and are worried that they might bend it too much, you should approach the task cautiously. As long as you do not apply excessive force and make minor adjustments at a time, rest assured you will be good to go.
First, start by measuring the neck relief. Do this by assessing the distance between the strings and the eight frets, which is the wire and not the fretboard itself. To check the neck relief more accurately, put the guitar in the playing position, as it will take any pressure off the neck that could distort the results and lead to a faulty neck relief adjustment.
Other factors that can affect the string’s height are the guitar’s bridge and the nut, so you must minimize their effect. This can be done by placing a capo on the first fret and another on the intersection where the fret meets the guitar body.
The neck relief measurement can vary according to the fretboard’s radius, so you must know of the radius; even if you do not, search up your guitar model and, in its specs, look for the radius’s measurement.
Take a feeler gauge appropriate for the radius and pass it under the E string. Make sure that you when pass the feeler gauge:
- You pass it right down and at a parallel, not at an angle.
- The gauge should pass through while in contact with the string and fret wire without any excess friction.
However, if you feel a lot of friction or the gap between the string and fret wire is too large, adjust the guitar’s truss rod using a hex key of the right size. For some truss rod nuts, the hex key comes with the guitar. If not, match the suitable one yourself.
Increasing the relief: to make the gap wider, turn the key away from yourself (counter-clockwise)
Decreasing the relief: to make the gap smaller, turn the key towards yourself (clockwise)
When done with the adjustment, measure the gap again, ensuring that the fret wire is touching the string without any unnecessary friction, and when satisfied with the results, take the capo off!
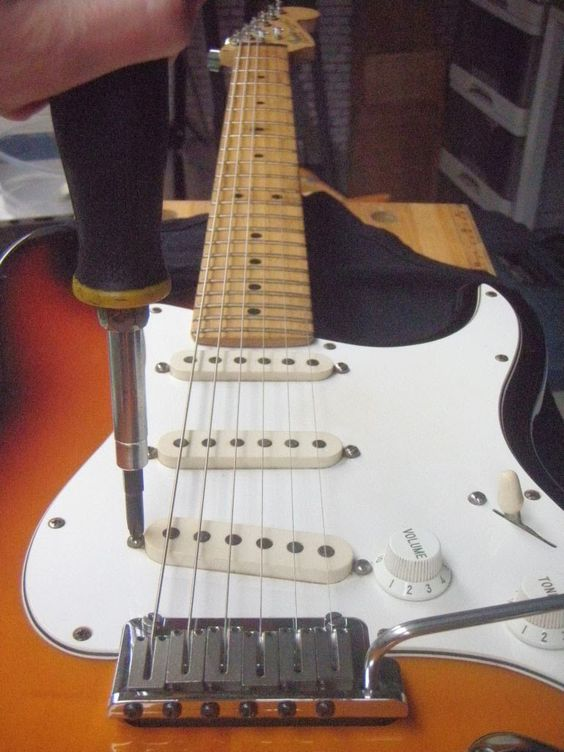
Step 4: Setting The String Height
The next thing is to set the string height; setting it will make the guitar easier to play and completely change how it feels when playing. The goal is to put the string as low and close to the fretboard as possible while avoiding causing a fret buzz.
Start by measuring the gap between the low E string and the 17th fret wire; use the ruler here to note the measurements. We will guide you on adjusting a single string, and then you can repeat the process with others.
For the bass strings, look for a measurement around 4/64th or 5/64th inch, and for,
Lighter strings (G, B, E) look for a measurement around 3 or 4/64th inch
If you want to customize these adjustments and want to lower the string, feel free to do so. However, just remember not to go low enough for the strings to buzz against the fret.
Stratocaster Style bridge
To raise or lower the string’s height by adjusting the bridge saddle, and while doing so, make small incremental changes with a hex key. Make sure that when adjusting all the strings, the saddle is leveled and not slanted.
Tune-o-matic Style bridge
You cannot set string height individually, so you have to make adjustments on either end of the bridge
Then, when the strings’ height has been set, tune them using the tuner and play the guitar to see whether the strings buzz against the fret. In the case that they do, adjust the string height!
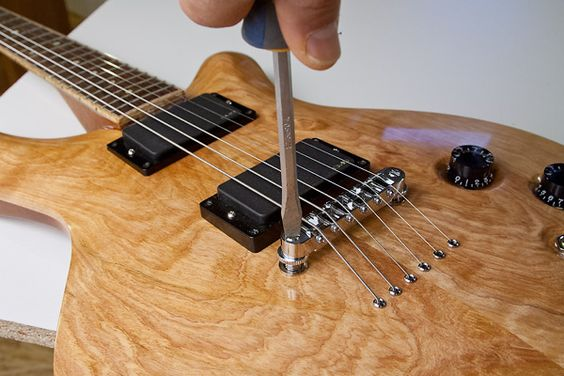
Step 5: Altering Pickup Height
Pickup height is the distance between the magnetic pickups on the electric guitar and the strings. The height can significantly affect your guitar’s output; in some cases, it is also fine-tuning the guitar.
Typically, the gap between the low E string and the twelfth fret is 1/8th of an inch, whereas the high E string, marginally closer to the fret, has a lesser gap. Measure the gap of your strings with the 64th-inch ruler and then begin with the alterations.
To adjust the pickup height, find the mounting screws:
To raise the pickup, tighten the screws by moving the screwdriver clockwise
To lower the pickup height, loosen the screws by moving the screwdriver counter-clockwise
Here, experiment with small changes regardless of whether you are lowering or raising the pickup, and after every gradual change that you make, play the guitar to test the sound.
Listen to the produced guitar sound carefully and notice any changes in playability, pitch, and tone, as it will further aid you in reaching the ideal pickup height that best suits your preferences and playing style.
Important note: adjust all pickup screws equally for them to have a similar output level so that one does not sound louder than the others.
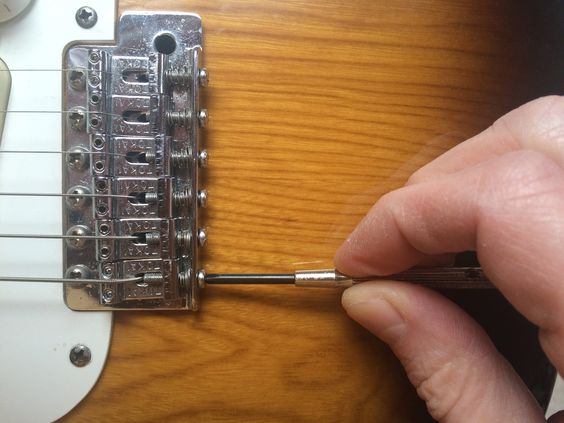
Step 6: Setting The Intonation
The guitar’s intonation is how in tune your instrument is across the entire fretboard. If the strings are in tune, it does not necessarily indicate that the notes on your fretboard will also be in sync.
You set your guitar’s intonation by subtly changing the string length by adjusting the saddle. It is integral that before you begin setting intonation, your guitar is fully in tune; you can do this by using the tuner and setting it to standard tuning.
To see if the guitar’s intonation is ideal, start with the low E string, play the open string, and then play the 12th fret. The 12th fret is also an E note, so the two strings should deliver the same sound.
While playing the note, play it as normally as possible because you do not want to bend the string out of the tune and get inaccurate readings. Now, on the tuner, see whether the note is sharper or has a higher pitch than it should be or if it is flatter or has a lower pitch than it should be.
If the pitch is:
Sharp, then tighten the screw by turning it clockwise
Flat, then loosen the saddle by turning it counter-clockwise
It is critical to keep in mind that you should re-tune the guitar every time you adjust the saddle. Once the strings are tuned for the open and lower E strings, repeat the process across all the strings until and unless they are all in tune.
Important note: if you have turned the saddle of the guitar back to the extent where it will not move any further and the intonation is still not right, then go back and check the guitar’s neck relief again
Step 7: Play The Guitar
Now that you have completed setting up the guitar by performing all the steps stated above, it is finally time to play the guitar. Try to feel if there are any changes or differences in how the guitar feels and the sound it produces. If you note carefully, you will see that the guitar setup has created many changes that can be heard and felt.
Even at this point, if something in the guitar does not feel right- it is not too late to go back, refer to the particular step, and re-perform it. The setup of your electric guitar is all about what suits you the best, so do not hesitate if the intonation has to be readjusted for that perfect pitch uncountable times.
Frequently Asked Questions
How often should I replace my electric guitar strings?
As a general rule players replace their strings every 3-4 months but it depends on various factors such as: How much you play, if you perform, if you sweat a lot, if you use coated strings. That being said if the strings start to feel rough, become discolored, have lost clarity, are rusty, constantly are going out of tune, it may be time to replace them.
Do electric guitars need a setup?
Yes, electric guitars need a setup and most will come set up from the factory. However, due to mass production of guitars it is a good idea to have the guitar set up. Especially if the guitar was built before the wood had fully aged. Setting up the guitar and adjusting its components helps achieve optimal tone, playability, and performance. Setting up the guitar is necessary in case you start noticing problems with it, like high action or fret buzz.
How do I avoid fret buzz when setting the electric guitar?
The best way to avoid fret buzz is to ensure the strings are not too close to the fretboard. One simple way to check for this is to see whether a piece of paper or a business card conveniently passes through the space between the fretboard and the strings.
How can you avoid bending the guitar neck too much when adjusting the truss rod?
Make sure to make small adjustments to the truss rod, make quarterly adjustments with the screwdriver to see if the screws are still loose or tight, and use the right size of the hex key for these adjustments.
Conclusion
Tuning the guitar is essential, and our detailed step-to-step guide makes it easy for you to do the setup yourself and at home. The more you do the setup, the more proficient you will become at it, and eventually, the time it takes you to do all the steps will lessen. At the end of the day- practice makes one perfect!
However, one thing you should never forget, which we have highlighted and stressed throughout the guide, is to abide by caution. Whether removing old strings and plugging in new strings, adjusting the truss rod, or setting the intonation, you should work carefully, not carelessly. It is important to understand that the guitar is fragile, and applying too much pressure or force to its setup can cause great damage.